

Fxd是什么
Fxd 是 Flow eXtension Define 的缩写,它是一个被设计用于工作流(尤其是AI和自动化工作流)扩展的规范。
比如说,你需要从RSS中监测最新文章,然后翻译为中文,并为其配图后,发布到自己的X上边。这个任务对AI来讲并不困难,但因为环节较多,很少有工具可以自动化完成。
按Fxd的做法,我们会首先封装以下几个Fxd App:
- RSS监测 App
- GPTChat APP
- DALL·E APP
- X发布APP
其中每一个都是独立的 NPM Package,而且每一个 APP 都可以通过 Fxd-Cli 在命令行下调用。这样,我们只需要用 Shell 或者其他脚本,将这些 Fxd App 组合起来,就可以灵活地实现各种功能。比如你不想发布到X了,改为发布到微博。那么只需要将最后一个APP 换掉。
对于不会使用命令行的用户,还可以使用兼容 Fxd 规范的客户端,比如我们正在内测的 FlowDeer,它可以通过可视化流程图的方式帮助用户设计工作流。
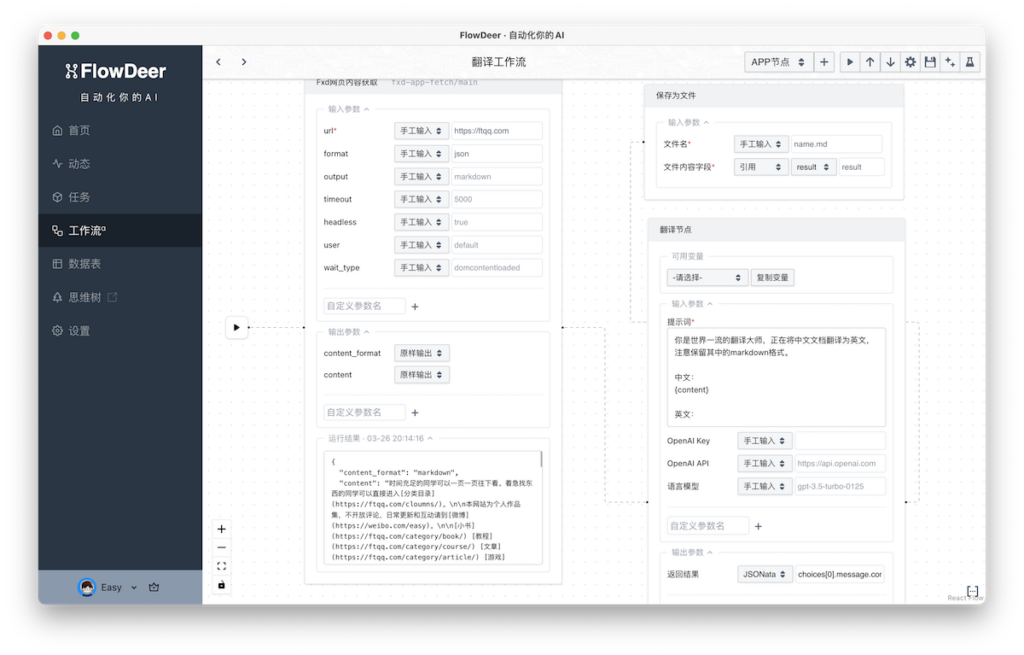
除了官方客户端,任何可以和命令行交互的软件,都可以整合 Fxd 的能力。
Fxd规范
参数
Fxd App本质上就是一个标准的 NPM Package,不同之处在于,它在 package.json 中添加了额外的字段,用于描述输入输出的参数和格式。一个具体的实例如下:
{
  "name": "fxd-app-fetch",
  "displayName": "Fxd网页内容获取",
  "description": "根据输入的url抓取网页内容,并进行优化和格式转换",
  "version": "1.0.8",
  "main": "index.js",
  "license": "SEE LICENSE IN LICENSE.txt",
  "type": "module",
  "meta": {
    "for": "fxd",
    "author_uid": 1,
    "args": {
      "main": {
        "url": {
          "name": "url",
          "description": "要获取的页面 URL",
          "type": "string",
          "required": true,
          "default": "https://ftqq.com",
          "example": "https://www.example.com"
        },
        "format": {
          "name": "format",
          "description": "返回数据格式",
          "type": "string",
          "required": false,
          "default": "text",
          "example": "json"
        },
        ...
      },
      "json": {
        "url": {
          "name": "url",
          "description": "要获取的页面 URL",
          "type": "string",
          "required": true,
          "default": "https://ftqq.com",
          "example": "https://www.example.com"
        },
        "format": {
          "name": "format",
          "description": "返回数据格式",
          "type": "string",
          "required": false,
          "default": "text",
          "example": "json"
        }
        ...
      }
    },
    "output":
    {
      "main":
      {
        "success":
        {
          "content_format":
          {
            "name": "content_format",
            "type": "string",
            "description": "返回数据格式,包括raw/markdown/html/text",
            "example": "html"
          },
          "content":
          {
            "name": "content",
            "type": "string",
            "description": "返回数据内容",
            "example": "https://www.example.com"
          }
        },
        "fail":
        {
          "error":
          {
            "name": "error",
            "type": "string",
            "description": "错误信息",
            "example": "获取页面内容失败"
          }
        }
      },
      "json":
      {
        "success":
        {
          "content":
          {
            "name": "content",
            "type": "string",
            "description": "返回的JSON数据",
            "example": "https://www.example.com"
          }
        },
        "fail":
        {
          "error":
          {
            "name": "error",
            "type": "string",
            "description": "错误信息",
            "example": "获取页面内容失败"
          }
        }
      }
    }
  },
  ...
}
可以看到:
- 所有关于fxd应用的额外信息都在 package.json 文件的 meta 属性中
- meta属性包含四部分: for 用于标识是否 fxd 应用;author_uid 用于识别开发者(uid用于将来的应用市场);args 用于描述输入参数;output 用于描述输出参数
- args 属性以方法作为一级分组,一个 fxd 应用根据使用场景可能包含多个方法。以 fetch 应用为例,main 方法用于获取 HTML 网页;json 方法则获取 JSON 格式的数据。
- 分组下包含的是字段信息。对于多个方法共用的字段,可以放到一个一级分组中,用|隔开多个方法即可。以 fetch 为例,对于 main 和 json 方法共用的字段,可以放到 main|json 方法分组下。
- output 属性和 args 属性类似,也采用方法作为一级分组,但因为 output 通常包含成功和失败两种情况,因此 output 属性采用 success 和 fail 作为二级分组。
- args 和 output 属性均包含多个字段,单字段的详细描述如下:
"name":
{
  "name":string, // 英文符号,和 key 保持一致
  "cn_name": string, // 中文名称
  "description": string, // 字段详细说明
  "type": "string" | "boolean" | "number",
  "enum": []string, // 选填,只有 type 为 string 和 number 时,且值为枚举时填写本字段
  "required": boolean, // 是否必填
  "default": "默认值" ,
  "example": "示例值"
}
入口
Fxd自动加载 module 的 default export,需要对外暴露run方法,接收以下参数
async run(args, opts, command, cli_path)满足以上要求的应用均可以在 Fxd cli 和 Fxd GUI(比如 FlowDeer)下运行。一个典型的 Fxd 应用如下:
export default class FxdSimple {

    async main(args, opts, command, cli_path) {
        // 这里处理业务逻辑
    }
}
当然,为了更高效地开发,我们提供了SDK和Core APP,详见后文。
Fxd的使用
Fxd 除了是一个纸面上的规范,还可以通过命令行和客户端直接使用。
Fxd-cli的使用
如果长期使用,推荐在系统上手动安装,因为Docker版不但更消耗内存、内部数据也不能持久化。
使用Docker
内置了一些 fxd app,包括:
fxd-app-fetch fxd-app-search fxd-app-check-chan fxd-app-weibo-publish fxd-app-keep-live fxd-app-keep-live2调用时,注意需要使用 bash -c 的方式调用,如:
docker run --rm easychen/fxd-docker bash -c 'fxd fetch --url="http://ftqq.com"'手动安装
环境要求
- node.js >= 18 (更低版本也许可以使用,但不在官方测试和支持范围)
确保 node.js 版本在 18 以上,可以通过以下命令确认:
node -v 如果低于 18,可以通过 n 命令安装并切换
sudo npm install n -g && sudo n install 18安装完成后,运行以下命令后再次确认 node 版本
hash -r  (bash, zsh, ash, dash 和 ksh 运行这个)
rehash   (csh 和 tcsh 运行这个)
安装命令行工具 Fxd-cli
npm install fxd-cli -g如果提示权限错误(Error: EACCES: permission denie),可添加 sudo 提升权限
sudo npm install fxd-cli -g安装完成后,运行 fxd 命令,如果安装正确,可看到如下输出:
$ fxd
Version:
 1.0.46
Usage:
 fxd core [command] [options]
fxd-cli 只是一个应用载入和运行工具,本身并不具有应用的功能。我们还需要安装其他 FxdApp 才能完成功能。
FxdApp的使用
安装
FxdApp 均发布在 npmjs.com 上,可以用过搜索 fxd-app- 前缀进行查找,并可以通过 fxd-cli 命令安装。以 fxd-app-fetch 为例:
fxd core install fxd-app-fetch如果提示权限错误(Error: EACCES: permission denie),可添加 sudo 提升权限
sudo fxd core install fxd-app-fetch执行
安装完成后,即可通过 fxd-cli 使用,例如 fxd fetch help 可以显示帮助:
fxd fetch help
Version:
 1.0.8
Usage:
 fxd fetch [command] [options]

Command - main:
 --url <string>	要获取的页面 URL (default: https://ftqq.com) (required)
 --format <string>	返回数据格式 (default: text)
 --output <string>	输出数据格式 (default: markdown)
 --timeout <number>	超时时间 (default: 5000)
 --headless <boolean>	是否启用后台模式 (default: true)
 --user <string>	用户名 (default: default)
 --wait_type <string>	等待类型 (default: domcontentloaded)

Command - json:
 --url <string>	要获取的页面 URL (default: https://ftqq.com) (required)
 --format <string>	返回数据格式 (default: text)
 --timeout <number>	超时时间 (default: 5000)
下边我们用 fetch 应用来获取一个 JSON 数据:
fxd fetch json --url="https://jsonplaceholder.typicode.com/users" --format="json"fetch 应用的 main 方法可以获取网页内容,它并不是简单的获取HTML,而是采用 Readability 分析页面内容并提取最主要的部分,非常适合用来提交给 GPT 等AI模型。
运行如下命令:
fxd fetch main --url="http://ftqq.com"由于 main 是默认方法,因此也可以被省略:
fxd fetch --url="http://ftqq.com"如果第一次运行,可能会遇到以下错误:
error in 2
node:internal/process/promises:288
            triggerUncaughtException(err, true /* fromPromise */);
            ^

browserType.launchPersistentContext: Executable doesn't exist at /home/ubuntu/.cache/ms-playwright/chromium-1105/chrome-linux/chrome
╔═════════════════════════════════════════════════════════════════════════╗
║ Looks like Playwright Test or Playwright was just installed or updated. ║
║ Please run the following command to download new browsers:              ║
║                                                                         ║
║     npx playwright install                                              ║
║                                                                         ║
║ <3 Playwright Team                                                      ║
╚═════════════════════════════════════════════════════════════════════════╝
这是因为 fetch 应用的 main 方法使用了 playwright 这个 headless browser,我们需要安装它。
npx playwright@1.51.0 install 注意这里我们指定了版本,因为之前发现高版本容易被风控,因此目前固定使用 1.51.0 。
根据提示,查看是否需要安装依赖:
sudo npx playwright install-deps 安装完成再次运行命令,稍等片刻可以看到输出:
fxd fetch --url="http://ftqq.com"

时间充足的同学可以一页一页往下看。着急找东西的同学可以直接进入[分类目录](http://ftqq.com/cloumns/)。

本网站为个人作品集,不开放评论,日常更新和互动请到[微博](https://weibo.com/easy)...
可以看到,这是网站主要内容转化为的 Markdown。如果需要保存为文件,可以使用管道输出:
fxd fetch --url="http://ftqq.com" > "ftqq.txt"如果你需要更格式化的输出,可以添加 format 参数:
fxd fetch --url="http://ftqq.com" --format="json"
{
    "content_format": "markdown",
    "content": "时间充足的同学可以一页一页往下看。着急找东西的同学可以直接进入[分类目录](http://ftqq.com/cloumns/)。\n\n本网站为个人作品集,不开放评论,日常更新和互动请到[微博](https://weibo.com/easy)..."
}
在通过命令行传递参数时,如果参数中包含众多换行和特殊字符,会非常容易出错。因此,所有的参数都可以用过base64的方式来传递。
假设参数为 a ,传递的值为 base64: 前缀 + base64(JSON.stringify(a)) 。
以下是 fxd 读取参数的源码,可以参考其逻辑:
if( content.startsWith('base64:') )
{
    content = jsonDecode(Buffer.from(content.replace('base64:', ''), 'base64').toString());
}
你可以使用 Playwright 的 CodeGen 来自动化生成无头浏览器的动作代码:
npx playwright codegen <你要记录动作的的网址,如https://ftqq.com> 更多资料请参考 Playwright 官方文档
Fxd官方框架及开发
FXD 代码已发布到GitHub,可供参考
为了实现以上功能,我们实现了一个基于Node JS的官方框架。在它基础上,你可以很快开发出一个 Fxd App。
我们先通过示意图来了解下 Fxd 命令行的工作原理:
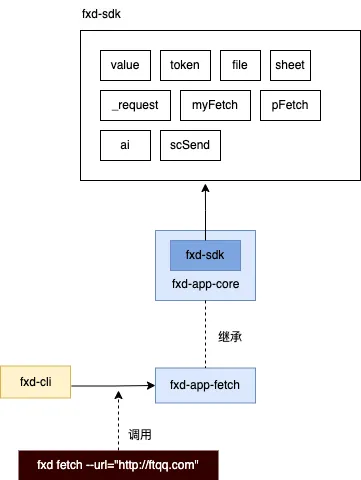
Cli入口和应用载入逻辑
所有的用户数据存放在 ~/.fxd 目录下。
cli 扫描 node_modules 中是否存在 packageName 对应的文件,如果存在,则载入并执行其 run 方法。具体逻辑可参考 fxd-cli/index.js 中的以下代码:
let thePath = `${packageName}`;

// 循环 paths,如果存在,则赋值给 thePath
for (const p of paths) {
    if (fs.existsSync(p)) {
        thePath = p;
        break;
    }
}

const app = await import(pathToFileURL(thePath));
module = new app.default();
// 如果存在 module.run 方法,则执行
if (module && module.run) {

    // params, opts, command, cli_path
    await module.run(params, opts, params[0], __dirname);
}else
{
    console.log("no module.run", module);
}
SDK和核心应用
所有的 FxdApp 均扩展自 fxd-app-core 应用,SDK 实例作为应用属性,可以通过 this.sdk 调用。可查看 fxd-app-core/index.js 相关代码:
export default class FxdApp {
    constructor() {
        this.sdk = new FxdSdk(getPackageInfo(import.meta.url));
        this.lastOpts = {};
        this.lastCommand = null;
    }
...
}
SDK包含各种常用功能:
- 对 ~/.fxd 目录下文件的操作:Token、File、Sheet、KeyVlaue存储等
- 辅助函数:getDirName、getPackageInfo、getHomeDir
- AI调用函数、消息发送函数(Server酱/AppRise)、Fetch函数
更详细的功能可参见 fxd-sdk/index.js 文件。
搭建开发调试环境
命令行调试
git clone https://github.com/easychen/fxd仓库采用了 Yarn workspaces 来管理多个包。在仓库根目录下运行:
cd fxd && yarn install
Windows 无法加载文件 **Roaming\npm\yarn.ps1 的解决方案
这是因为策略限制导致的错误,请按以下步骤解决:
- 搜索Powershell,右键以管理员身份运行
- 输入 Set-ExecutionPolicy RemoteSigned 然后选 Y
- 关闭PowerShell,重新运行 yarn 命令
然后进入命令行的目录
cd packages/fxd-cli
类Unix系统上,将目录下的 ./fxd 作为命令行工具使用即可:
# 查看帮助
./fxd core help

# 查看Demo应用帮助
./fxd demo help
Windows上需要手工添加 node 命令前缀
# 查看帮助
node fxd core help

# 查看Demo应用帮助
node fxd demo help
你可以为 fxd-app-demo 创建副本进行修改调试,完成后,npm publish fxd-app-your-app 发布即可在所有支持FXD规范的软件中使用。
在FlowDeer中调试
默认情况下,FlowDeer直接安装 NPM 网站上的包;但我们有需要在发布前调试。这里提供一种解决方案:
由于FlowDeer会优先在本地目录查找,因此我们可以通过命令行在 FlowDeer 对应的目录下运行 npm install <package-path> 进行本地安装。
具体而言,对于Mac系统:
cd /Applications/FlowDeer.app/Contents/Resources/app.asar.unpacked/src/local-api
npm install path/to/your/package
如果你没有将 FlowDeer 安装在 Application 目录,请自行调整 /Applications/FlowDeer.app 部分路径。
对于Windows系统:
cd <FlowDeer目录>/resources/app.asar.unpacked/src/local-api
npm install path/to/your/package
安装完成后,再在 FlowDeer 界面添加包名即可。
扩展现有应用
下边我们举一个具体例子来讲解如何扩展现有应用,来加入新功能或者简化使用。
fxd-app-check-chan 是一个监测 url 内容变化并发送通知的应用,它接受如下参数:
 --url <string> 要打开的页面 URL (required)
 --headless <boolean>   是否使用无头模式 (default: true)
 --selectors <string>   要检测的元素的 CSS 选择器,多个用逗号分隔 (default: body)
 --prejs <string>       页面加载完成后执行的自定义 JavaScript 代码
 --prejs_args <string>  自定义 JavaScript 代码的参数
 --preplay <string>     页面加载完成后执行的自定义 Playwright 代码
 --timeout <number>      Playwright 操作超时时间,单位毫秒 (default: 60000)
 --list <boolean>        选择器是否返回元素列表 (default: false)
 --user <string>        浏览器使用的用户目录 (default: default)
 --format <string>      返回的数据格式 (default: text)
 --sendkey <string>      Server酱sendkey,设置后有变动时会发微信通知
 --feed_publish <boolean>   有变动时是否发布Feed
 --feed_as_public <boolean>   发布Feed时,是否在RSS中可见
 --wait_type <string>   等待元素出现的方式 (default: domcontentloaded)
通过指定 selectors 参数,理论上我们可以监测所有网页。但 selectors 过于技术化,并不是所有用户都会使用。因此,我们针对只需要监测抖音账号是否有作品更新用户,提供一个定制版的应用 fxd-app-douyin-count。
这个应用只接受一个参数:
--url <string> 抖音用户主页 URL (required)selectors 我们会直接写死在应用中,这样用户不用了解这个非常技术化的概念。
fxd-app-douyin-count 的代码如下:
import FxdCheckChan from 'fxd-app-check-chan';
import { FxdSdk, getPackageInfo } from 'fxd-sdk';

export default class FxdDouyinCoutn extends FxdCheckChan {
    constructor() {
        super();
        const oldArgsSettings = this.sdk.args;
        this.sdk = new FxdSdk(getPackageInfo(import.meta.url));
        this.sdk.args = this.mergeProps(oldArgsSettings,[
            'watch',
            'main|check|watch.-selectors,prejs,prejs_args,preplay,list'
        ]);
    }

    async main(args, opts, command) {
        opts['selectors'] = `[data-e2e='user-tab-count']`;
        return await this.watch(args, opts, 'watch');
    }
}
这样 fxd-app-douyin-count 应用就已经完成了。使用方式:
fxd douyinCount --url="https://www.douyin.com/user/MS4wLjABAAAAHwf1DAfgUg4cxizx9nLC1JozAR1P-jGOhagrX9pgLz8" --format="json"额外说明
Fxd应用一般不是常驻后台,而是由用户将其添加到Cron中执行,因此即使是定时监测网页的任务,也只需要处理一次的情况。可以使用SDK中的命令来存储数据以供下次使用。
调用现有应用
有时候我们需要开发的功能,另外一个Fxd App已经开发完成了。这种时候完全没有必要重复开发,直接把它用起来就好了。
假设我们正在开发一个定时检测RSS并发布将最新的一个文章发布到微博的应用。当我们开发完成RSS监测功能后,就需要发布微博。
发布微博这个功能 fxd-app-weibo-publish 已经做过了,所以我们可以直接使用它。具体方式如下:
import FxdWeiboPublish from 'fxd-app-weibo-publish'; // 首先 import进来

async main(args, opts, command) {
    this.setDeaultOpts(opts);
    this.setDeaultCommand(command);
    this.format = this.get('format');
    // ...
    // 这里要发布微博了
    const weibo_publish = new FxdWeiboPublish();// 创建对象
    result = await weibo_publish.publish( // 调用 publish 方法
        null, // 第一个参数留空,第二个参数参入调用参数
        {
            content: 微博内容,
            headless: String('false'), // ⚠️ 特别注意这里的参数需要String类型,否则不生效
            user: this.get('user'),
        },
        'publish' // 第三个参数固定为被调用的方法名,也就是 publish
    );
}
⚠️ 特别注意这里的转发参数需要用String类型,否则不生效
那么如何知道 fxd-app-weibo-publish 有哪些方法和参数可以用呢?输入
npm view fxd-app-weibo-publish meta可以看到相关设置:
{
  args: {
    'main|publish': {
      content: {
        name: 'content',
        cn_name: '微博正文',
        type: 'string',
        required: true,
        description: '微博内容'
      },
      headless: {
        name: 'headless',
        cn_name: '后台模式',
        description: '是否使用后台模式',
        type: 'boolean',
        default: true,
        example: 'true'
      },
      user: {
        name: 'user',
        description: '浏览器使用的用户目录',
        type: 'string',
        default: 'default',
        example: 'admin'
      },
      format: {
        name: 'format',
        description: '返回的数据格式',
        type: 'string',
        default: 'text',
        example: 'json',
        enum: [ 'json', 'text' ]
      },
      timeout: {
        name: 'timeout',
        description: ' Playwright 操作超时时间,单位毫秒',
        type: 'number',
        default: 60000,
        example: 30000
      },
      wait_type: {
        name: 'wait_type',
        description: '等待元素出现的方式',
        type: 'string',
        default: 'domcontentloaded',
        example: 'networkidle',
        enum: [ 'domcontentloaded', 'load', 'networkidle' ]
      },
      images: {
        name: 'images',
        cn_name: '微博配图URL',
        description: '图片地址,用逗号分隔',
        type: 'string',
        default: '',
        example: 'https://www.baidu.com/1.jpg,https://www.baidu.com/2.jpg'
      },
      self_only: {
        name: 'self_only',
        cn_name: '仅自己可见',
        description: '是否仅对自己可见',
        type: 'boolean',
        default: false,
        example: 'true'
      }
    }
  }
}
从头开始编写FxdApp
一般情况下,我们推荐直接继承现有应用,当然如果没有合适的应用,则可以按以下步骤编写新应用。
Fxd 现在已经支持AI生成新应用骨架和部分代码,点击这里查看如何使用
创建目录
以 fxd-app- 开头,用 - 分隔单词,比如 fxd-app-demo。
package.json
运行 yarn init -y,初始化一个 package.json。补充 meta 字段,用于描述作者和参数信息
{
  "name": "fxd-app-demo",
  "version": "1.0.0",
  "main": "index.js",
  "license": "PolyForm-Noncommercial",
  "type": "module",
  "meta":
  {
    "for":"fxd",
    "author_uid":0,
    "args":
    {
      "main":{
        "url": {
        "name": "url",
        "description": "要打开的页面 URL",
        "type": "string",
        "required": false,
        "default": "https://f.ftqq.com",
        "example": "https://www.example.com"
        }
      }
    },
    "output":
    {
      "main":
      {
        "success":
        {
          "code":
          {
            "name":"code",
            "description": "状态码"
          }
        },
        "fail":
        {
          "error":
          {
            "name":"error",
            "description": "错误信息"
          }
        }
      }
    }
  }
}
index.js
创建 index.js,填入以下代码:
import FxdApp from 'fxd-app-core';
import { FxdSdk, getPackageInfo } from 'fxd-sdk';

export default class FxdDemo extends FxdApp {
    constructor() {
        super();
        this.sdk = new FxdSdk(getPackageInfo(import.meta.url));
        // ...
    }

    async main(args, opts, command) {
        this.setDeaultOpts(opts);
        this.setDeaultCommand(command);
        // 以上两行设置后,this.get可以不传入第二和第三个参数

        console.log(this.sdk.name, command, args, opts, this.get('url', opts));
    }
}
测试应用
在应用目录下,运行 fxd demo main 即可运行应用。
发布应用
当测试完成后,可以通过 npm publish命令发布到官方。当然,你需要注册并登入 npmjs.com 。具体的教程请自行查找。